Wednesday, 8 December 2010

Beauty News: This Makeup Junkie Is In 24 Hours Today!
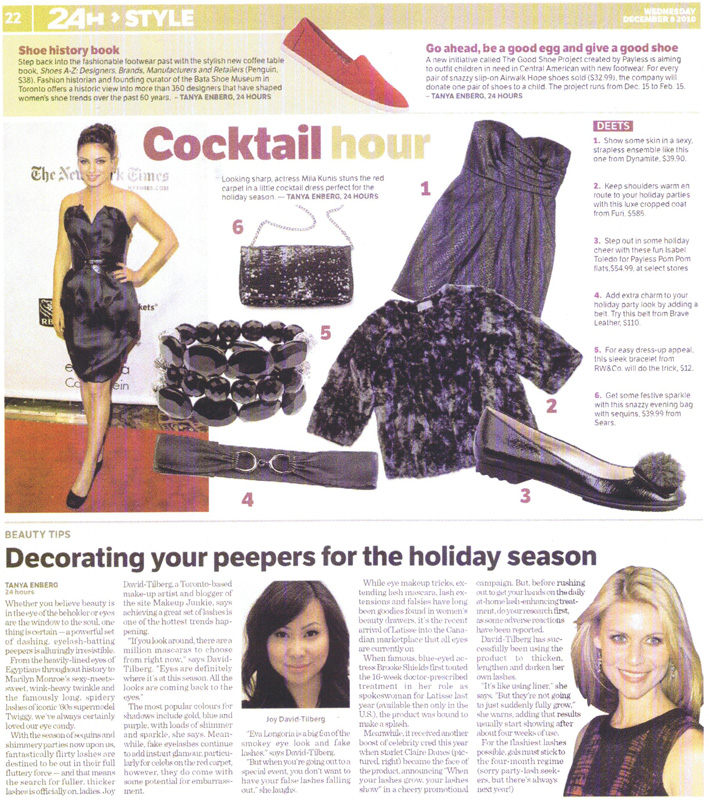
I'm thrilled to be in today's Toronto edition of 24 Hours! Check me out on page 22 talking about holiday beauty trends and Latisse, the first and only prescription eyelash growth treatment that is now available in Canada. In case you haven't heard, I am currently the beauty expert for Latisse and I've also been lucky enough to give this lash treatment a spin! It's only been a little over a month and I'm starting to see some growth and fullness.
If you're not familiar with Latisse it grows your natural lashes longer, fuller and darker. The results are significant as well! When I get a chance I will post some photos of my lash progress. Like the article says, if you try the product now you won't have lush lashes in time for your holiday parties. It takes 16 weeks to see full results. But hey, why not start the new year with long, beautiful lashes?? When you reach for your eyelash curler and mascara, it won't take much effort to get that flirty lash you've always wanted! Sounds good in my books!
As with any cosmetic treatment, book an appointment with your physician to see if Latisse is right for you. Customers can only get this product with a prescription. Latisse has been clinically tested to safely and effectively grow your natural lashes. If you have any questions, feel free to contact me anytime!
To read the rest of the 24 Hour article click here. Thank you to Tanya Enberg for your fabulous write up!
For information on doctors in your area that prescribe Latisse click here. For more information on Latisse visit
Tuesday, 7 December 2010
Were It In Color...

This is going to be fun!!! I want to do some tutorials where I take a B&W photo and put my spin on what I think it would look like were it in color. I've mostly looked at well known people like Bridgette Bardot (above) so we kind of already know somewhat the feel of their personal look. It could be fun to do random photos too!!! Do you want to play too? You can participate by sending me a photo or choosing one yourself and sending me the B&W then one of you doing that look. Ready? Set? GO!!!
Beauty Blender

I've been using this Beauty Blender sponge for a week now and I must say...I am in LOVE!!!!! The appeal for me was seeing how many celebs use it and seeing their flawless application. I figured, let's check it out and see if it lives up to the hype! I. AM. SO. IMPRESSES!!!!!! The beauty of this blender (no pun intended) is it's small egg-like shape, with the added point, but no edges. No edges = a more streak free application. It is recommended you use this slightly damp so it expands. As it expands, it gets even softer and creates SuCh a smooth application. You use a stippling technique (which I'll demo in a future tutorial) so that it deposits and blends at the same time. I love using the pointy edge for more control in hard to reach places, like under my eyes and around my nose. One of the BeSt things about this sponge is that it is REUSABLE!!!!!!! Treat it like your mascara ladies and use it for up to 3 months! It comes with a cleanser and a dArLiNg little pedestal where it can dry and get ready to fulfill it's purpose yet again =). Add it to the list girls!!!!!
Holiday 2010: All I Want For Christmas Is...Smashbox The Gold List!

Give me gold and I'm a happy girl. If you're looking for that gorgeous glow this season, look no further. I love the holiday sets from Smashbox especially The Gold List! Nothing says festive than a little holiday bling!
This is a great gift that keeps on giving. With each purchase from the Smashbox WISH collection, Smashbox will donate $1 from every purchase, up to $25,000, to Children's Miracle Network, a nonprofit organization that grants the wish of life by providing medical care, life-saving research and ongoing education to help millions of kids overcome diseases and injuries. The set includes:
- Fusion Soft Lights in Baked Starburst (Regular Size)
- Photo Finish Luminizing Foundation Primer (Travel Size)
- O-Gloss Gold (Regular Size)
- Photo-Op Under Eye Brightener (Regular Size)
- gold metallic cosmetic case

Smashbox's original Photo Finish primer is a best-seller and is great for normal to dryer skin tones. The luminizing version is definitely for someone that has close to perfect skin and who isn't too oily. It feels amazing on the skin and gives you the perfect canvas. The primer gives the skin a subtle but noticeable luminous glow.The gold warm hue gives pale winter skin a much needed boost. Makeup stays on all day but because I have an oilier t-zone, my nose did get really shiny throughout the day.

The Fusion Soft Lights (left) can be used on fair to medium skin as a luminizing blush and on med-dark (like myself) to dark it works beautifully as a highlighter. The texture is amazing and velvety soft. Photo Op (middle) is an under eye brightener I use to use religiously. I forgot how much I loved this stuff. The tip is to apply only where it is dark - avoid fine lines as it will start to settle in the lines. I love it on it's own when I'm in a rush or doing errands - doesn't give me total coverage but just enough to brighten and not look overdone. I also love layering it under my concealer for an extra brightening effect.
I LOVE the O-Gloss in Gold. I know from past reviews of the original O-Gloss some people hated it and some loved it. First, the gloss is so smooth and almost feels like a lip balm. Second, when applied on my lips it turns into a lovely shade of peachy-pink with gold shimmer. In case you didn't know, O-Glosses react to your natural body chemistry and is customized to your pH balance. It looks gorgeous on it's own or layered over your favourite lipstick for a pretty pouty effect.
Oh, and the gold makeup bag is super cute! The set is perfect to travel with and is awesome for on-the-go touch-ups. Yes, another must-add to your wish list!
Have you tried this set? Love it? Hate it? Want it?
Smashbox The Gold List retails for $49 USD and is available at Sephora locations and online at Sephora.com.
Monday, 6 December 2010
12 Days of Holiday Beauty: Side Bun With Some Holiday Sparkle!

Photo Credit: Glamour.com
Believe it or not, buns are actually very easy to do. Doing a quick bun can help make any outfit look even more glamorous and fun especially when you add a sparkly hair clip. Buns in general are making a comeback so whether you’re doing a classic chignon, ballerina bun, or french twist there are many ways to make it look modern and festive.
Some women hate having their hair pulled back (myself included) which is why a side bun is a great way to show off some hair while keeping it off the face. To keep it from looking too awkward or juvenile, make sure the placement of the bun is pulled slightly to the side and lower on the nape of the neck. Also, if you are wearing something asymmetrical place the bun on the side where your shoulder is bare.
Step 1: If you’re styling your hair after showering, apply a volumizing mousse at the root of the hair. Finger dry your hair until it is bone dry. Flip your hair upside down to dry it faster and to give you extra volume. If you’re styling from dry, spray a volumizing spray at the root or use a dry shampoo. The side bun will look less severe with volume at the top and when it is not pulled so close to the head.
Step 2: Curling your hair will make it easier to style into a bun. Wrap 1 inch sections of your hair around a barrel curling iron. This will create a really pretty “s” wave. Make sure the ends are completely curled and not straight. For a quicker solution, put your hair in hot rollers and take them out when your makeup is done. If you don’t have hot rollers, use regular velcro ones and heat with your blow dryer. Use your cool shot to set the curls.
Step 3: Once your curls are done, gently finger comb through your curls. Start loosely gathering your hair leaving volume at the top and positioning it to the side. Once you are satisfied with the placement, wrap a hair elastic around like you would a regular pony tail. Take a small section underneath the hair and wrap around to hide the elastic. Secure with two bobbi pins.
Step 4: Now it’s time to have fun with your hair. Because your hair is curled, you can roll it anyway you’d like. If you’d like some of the curls to show, pin the majority into a bun leaving some pieces out. If you’d like a more classic round shape, wrap the hair around following in the direction the curl falls. Cross pin until you feel the hair secure. If you like hair around your face, pull a few pieces for a messy, modern feel. Spray with an extra hold hair spray to keep the style secure.
Step 5: Add a fun, sparkly hair clip on the bun, to the side of the bun, or just behind your ear. There are a variety of hair clips to choose fun so go with one that compliments your outfit or your personality!
Would you do this hairstyle?
Shiro Giveaway!

LipsticksandLightsabers is hosting a giveaway for the brand new Kawaiishadow collection from Shiro! Open internationally and ending on Dec 7, hurry and enter! They're too cute to miss ;D ENTER HERE!
Subscribe to:
Posts (Atom)