Here are some things I've purchased that LOVE!!! Enjoy =).
Tuesday, 31 January 2012
Beauty Feature: Save Your Skin!

Save Your Skin! by makeupjunkie13 on polyvore.com
How's your skin doing this winter? Feeling a little tight? Looking a little flaky and dull? Add not drinking enough water to the mix and lack of sleep and you've got my skin - one big wrinkly mess. I hate to say it, but I've really been noticing my fine lines and wrinkles under my eyes (insert sad face). Well, I'm happy to say I think I have finally found a skin care routine my skin is happy with! This is major. I get to try tons of skincare and I never really commit to anything. I am no longer a commitment-phobe. These lovely products are now a skincare staple!
Spring is just around the corner (wishful thinking) so save your skin now!
1. Korres Wild Rose Face & Eye Serum ($49 CAD, Bestseller): I have found my new serum. While I love my Bobbi Brown one, Korres' has stolen my heart. It's a brightening serum for the eyes and face and it is meant to smooth fine lines. It contains Wild Rose oil, Vitamin C, Baobab gel, Ginseng extract, Quince extract, provitamin B5. Sounds amazing right? It's a multivitamin for your skin. I love how radiant my skin looks. I've only been using it for a week so I haven't noticed a big difference in the appearance of my fine lines, but the brightening effect helps minimize the appearance.
Korres is known for being an all-natural line so I love knowing my skin isn't being fed with yucky chemicals. Another bonus is that you can use it on the eyes like an eye cream - one less product you have to buy. Compared to a lot of serums out there, this is a much more affordable option. It's not cheap by any means, but it's mid-range so it's affordable to most of us. It's a 30 ml bottle so we'll see how long it last, but one pump is all you need to cover the face. This is definitely one serum that I will be purchasing when this one runs out!
2. Korres Wild Rose 24 - hour Moisturizing and Brightening Cream - Normal to Dry Skin ($44 CAD, Bestseller): This with the serum is a powerful combo. I LOVE this moisturizer! I had my favourites from 2011, but this one by far takes the cake! Besides looking uber luminous, my skin feels plush - that's plump and lush. It's so pillow-y soft! The best part is that my skin never has a surprise flaky patch later on in the day. Again, it contains the same ingredients as the serum so your skin is getting double dose of Vitamin C. Your skin will be in repair mode all day long so I have high hopes for my skin! It's a 40 ml container at $44 so mid-range and affordable compared to other brands. Since it's a richer moisturizer, you only need a little at a time. You get the perfect amount of hydration minus the heavy, greasy feeling. Another staple for me!
3. Cover FX Skinprep FX Nourishing Foundation Primer and Anti-Aging Serum ($45 CAD): I love Cover FX. You get high-quality makeup that performs with anti-aging benefits. If you get a chance to see my kit, you'll see many of their primers. While you can use this particular one as a serum at night, I prefer to use it as a primer before foundation especially on drier and mature skin. I use this one on myself because it hydrates my dry skin especially during the winter. Once you apply it, your skin feels extremely smooth and makeup just applies so easily. It really creates a perfect canvas. Because it helps blur out fine lines and pores, you end up having to use less foundation. You're makeup will also wear longer with minimal touch-ups. This is a definite kit staple for me and it should be for you too!
4. Ole Henriksen Black Current Perfecting Complexion Oil ($32 USD): This product is my introduction to Ole Henriksen products. All I can say is that I'm so glad we met! I've come across a few face oils in the past but I never really used them mostly because my skin just felt heavy after. This oil helps protect your skin from the elements and this is definitely something you should use for the cold winters. It also contains Vitamin E that repairs the skin from environmental damage. It's a rich oil so I've decided to make it apart of my night routine and use it like a serum. Surprisingly the rich texture turns into a light, calm, and refreshed feeling on the skin. Mixed with my night cream, my skin feels like butta'! The first time I used it, I couldn't stop touching my face. I even made the hubby touch it! Obsessed with this product. You only need a few drops of this to cover the whole face so it'll last you a while until you have to replenish. Again, the price is mid-range and definitely affordable.
5. Korres Quercetin & Oak Anti-Aging and Anti-Wrinkle Night Cream ($59 CAD, Bestseller): This night cream is no joke. It provides intense anti-ageing nourishment throughout the night. Quercetin and Oak is a clinically proven natural alternative to Retinol. Retinol is used in every anti-aging cream out there so why not go for a natural version that has been proven to achieve faster results? I'd have to say this is richer than my beloved La Mer cream and it's double or even triple the price! It's insane how soft my skin feels after I apply it - I am not exaggerating. My dry skin loves a rich cream, but not if it makes my skin feel greasy and this does NOT. I've been using it for a week and I can already see a difference in the texture of my skin. It's smoother and it's cured my flaky, dehydrated skin! Love, love this stuff.
All products are available at Shoppers Drug Mart across Canada and Sephora.
Products were sent for editorial consideration and I truly love them.
Monday, 30 January 2012
Look: "Christmas Afterparty", and catching up

Yay, I'm back! I'm going to try and catch up on what I've been doing these last few weeks: If you read my last update post, you know I was unable to post since Christmas. The reasons being #1, a death in my family and #2, I ran out of photo storage space on my free blog account. I just purchased more space so now I can finally post again. :)
Picking up where I left off, this is my half of the Christmas photoshoot I did with my brother and sister. (You can see sister Becky's post here.)
Our brother gave us studio photography equipment as a Christmas present, so he helped us figure out how to use it (well, he tried.. lol) and we had a fun photography session. I threw on some quick makeup for the occasion because I figured, why waste a photoshoot? xD
 |
| Pics are clickable :) |


 |
| Some of these are a little awkward lol |

I'll try to remember what I used...
-mark. face primer
-CS Camouflage Concealer palette (lightest shade)
-mark. Powder Buff in Nude
-Eye and lip primer from BFTE on eyes (I think)
-NYX JEP in Milk
-Sugarpill pressed eyeshadow in Afterparty (bold blue on lid)
-BH 120 Palette, 1st Edition (Teal, yellow, champagne highlight, and brows)
-UD pencils in Zero (black on upper lid) and Radium (bright blue on waterline)
-Cover Girl Lash Perfection mascara in Very Black
-Some kind of blush, don't remember :(
-mark. Juice Gems lip gloss in Juicy Snow Peach
-BFTE shadow in 24K Gold (gold shimmer/glitter on cheekbones but you can't see it in the photos)
Pretty short compered to the usual long list of products, lol. I won the Afterparty eyeshadow in a blog giveaway, I'll post about that soon!
My brother also got me Aperture on my laptop so I've been using that for my pictures. Some of the pictures I'll be posting, including these, will have been edited in Aperture, but I usually only edit slightly for things like cropping/resizing, white balance, sharpening, etc. I might make some kind of picture editing disclaimer to include in my posts, what do you think?
Anyway, I hope you enjoyed the pics and I can't wait to show you what else I've been up to! ;) Hope you're all doing well, leave me a note to say hi!

Thanks for reading!<3
Brow Lesson From the Glow

The right eyebrow shape not only visually lifts and opens your eyes, it also polishes your entire look. The best method for DIY brow shaping is tweezing because it's precise and more goof-proof than waxing — especially if you're a first-timer. Celebrity makeup artist Vincent Longo agrees. "With waxing, a detailed contour is more difficult to pull off on your own," he says.
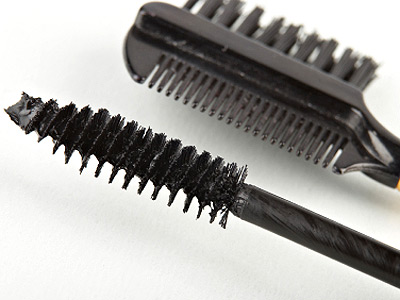
Before you get started, you'll need a few tools: A magnifying mirror or any mirror placed near a window (natural light will help you see every stray hair); grooming scissors; a good pair of tweezers (Tweezerman's Slant Tweezer is great for beginners); and a brow brush (try the Dior Brow Brush). (or a cheaper option, try a toothbrush)
The best time to pluck is right after a steamy shower, which will open up your pores and make it easier to remove hairs. (pores do not open and close. They harden and soften so I'm sure they meant to say they will be soft at that point) Make sure you have time on your hands — tweezing can't be rushed! After you're done plucking, use an antibacterial wipe to clean your tools. Soothe any redness and swelling on your brow area with arnica gel, an herbal remedy that reduces inflammation, says Longo. And wait several minutes before applying lotions, creams, or makeup.
Step 1: Determine your basic shape. Figure out where your eyebrow begins by placing a pencil vertically against the side of your nose and the inner corner of the eye. Any hair that goes beyond this line should be tweezed. Next, place the pencil diagonally from the side of your nostril to the center of the pupil — this is where the highest point of the arch needs to be. A straight line from the side of the nostril to the outside corner of the eye determines the end point. Hair extending into the temple area should be plucked. (go to my perfect brow tutorial for the "pencil test").
Step 2: Brush your eyebrows upward with the brow brush (a baby toothbrush works too!) and carefully trim any extra-long hairs. Then comb downward, and — very conservatively — cut excess length.
Step 3: Tweeze one row of hair beneath the brow, between the points you identified in Step 1. To lessen the pain factor, pluck in the direction of hair growth. Open up the arch by removing a second row of hair from directly underneath it. Lastly, pluck random hairs below the brow line and between the eyes.
Remember: Less is more! Over plucking looks unnatural and requires a six-month "no tweezing" period to correct. Plus it adds more age to your face! Stick to these rules, and you'll have enviable brows in no time.
Sunday, 29 January 2012
Apart from being a klutz, I am also absent-minded.

Hi everyone! I should have done this a month or so ago when I first moved my site. If you still remember me, then I'd like to let you know that I've moved sites--and this time it's for real, and it's permanent.
So what's new?
From now on, I'll be on my new makeup blog. I decided to finally try my hand at being a professional makeup artist in the Philippines, so you can also see my portfolio on my new site.
I've also started making makeup tutorial videos on youtube. I'm still kinda new to it, but I hope I'll get there soon enough... I'm learning!
That's it really for my quick post and I was just hoping that you could give my new site a quick check--I do think I've got great new posts there waiting for you. I've come a long way from the time when I first started this blog and I do think it shows. In any case, I hope it's not too much to ask from all of you sisters of mine, especially since I've practically dropped off the face of the planet.
Here are my new URL's. :) I hope to reconnect with you all. I feel so behind on the times now! If you do drop by, please let me know.. I'd love to have a quick chat with you!
Monday, 23 January 2012
Lash Out
The Daily Glow is a website I love to peruse through. It gives great tips and tricks for a well rounded healthy lifestyle. When I find something that I think is just fabulous I tuck it away and bring it to you on Monday. I've always heard of the stigma surrounding Mondays. It's the day we don't want to get out of bed, the start of a work week after a playful weekend, blah blah blah! Let's change that! Monday is a day of new beginnings. For me, it's the day after a great Sunday at church listening to great talks, lessons and me taking notes on how I want to better myself. Monday is my exciting "start time". Am I Pollyanna and love it every week? Of course not, but I don't hate it more or less than any other day of the week. I want you to be able to wake up to some refreshing tips and tricks every Monday to help YOU have a better day and work on or try something beauty related for the week. Do I expect a report come Friday? No, but I wouldn't mind it either ;). If you try anything out there in the world of beauty let me know! Write a review! You may just see it published here on the Classy Blog! Okay enough from Chatty Kathy, let's talk Mascara! Many of you know that I wear false lashes everyday and LOVE them, but for those that haven't taken the plunge or don't want to, here are some helpful tips. As always, my comments and opinions are in red.

Time to Lash Out
Mascara has been a cosmetics staple since the ancient
Egyptians stained their lashes with kohl about 6,000 years ago. Now a tube of Maybelline's iconic Great Lash mascara is sold about once every second somewhere in the world.
When it comes to immediate cosmetic results, mascara is hard to beat. “It’s the quickest way to frame your eyes and give them instant definition,” says Carmindy, makeup host of What Not to Wear.
Perhaps because we expect so much from a humble tube of pigment, we experience a range of frustrations with mascara to this day — clumping, flaking, and smearing. “It takes a lot of trial and error to find the best mascara for you,” says Ricky Wilson, a celebrity makeup artist for Dior. “Women sometimes forget that the lashes are their own hair and just end up buying a mascara based on a commercial or what their friend uses.”
Read on to find out how makeup artists and cosmetics chemists avoid and address mascara mishaps. Plus, learn which formulas they say are the best for you.

Clumping
Does your mascara transform you into Tammy Faye Baker? To address clumping, Ni’Kita Wilson, a cosmetic chemist and vice president of research and innovation at Englewood Lab, in New Jersey, recommends blotting the brush on a clean tissue to remove excess pigment that can be deposited in clumps.
Also, check the product label. “Mascaras with a high wax content will smear easier and can be prone to more clumping than mascaras with more gums,” Wilson says. Waxes commonly found in mascara include paraffin, carnauba, and beeswax. Gums might be gum tragacanth and methyl cellulose.
The mascara brush matters just as much if you have trouble with lumpy lashes. Celebrity makeup artist Kristofer Buckle prefers “a silicone brush that glides through lashes while perfectly separating them.” He also recommends avoiding brushes that feature a wide spiral formation. “This allows an uncontrolled amount of product to be coated onto lashes, leaving them clumpy.”
CoverGirl LashBlast Fusion ($8.99) delivers a separated-lash effect by means of a silicone brush and a slick formula.

Flaking
Just as a little pain is the price we pay for wearing high heels in the pursuit of mile-long legs, flaking is often the unpleasant consequence of the quest for longer lashes. The polymers used to make mascara waterproof and to elongate lashes tend to flake, says Ni’Kita Wilson. “They are necessary, and it's difficult to avoid them in lengthening and waterproof formulas,” she says.
The solution is all about application technique. Wilson says the key is to apply just one or two coats. Also, allow each coat to dry completely if you apply more than one. If you’re not seeing the results you want with two coats, consider switching to a cream formula for more volume and fullness, says Sarah Lucero, a makeup artist with Stila.
For a flake-free option, try Nuance Salma Hayek Full Effect Ultra-Volumizing Mascara ($9.79).

Smearing
Pandas and raccoons are pretty much the only creatures that look cute with black rings around their eyes. Humans, not so much. Smearing of mascara is usually more of a problem in warmer weather, when heat and humidity break down your makeup. Ni’Kita Wilson suggests wearing a waterproof formula when it's warm, but one that contains polymers rather than waxes. “Polymers form a film around lashes that is more likely than waxes to seal the pigments in place,” she says.
You can also prevent mascara runoff with some carefully placed translucent powder, Buckle suggests. He advises patting powder around your eyes — to cut down on oil and moisture — before applying mascara.
To avoid mascara smear, try Neutrogena Healthy Volume Waterproof Mascara ($7.99). I am a fan of Benefit's waterproof mascara.
Stubbiness
Ni’Kita Wilson maintains that length is where the brush is every bit as important as the formula. “You want to make sure that you're using a brush that allows you to get to the base of your lashes without gouging your eyes,” she says. “Women with really short lashes may want to opt for a thinner brush or a comb-style brush.”
Combing through your lashes can also help prevent a short, stubby effect, says Brett Freedman, a makeup artist and the founder of Vanitymark. A ‘wetter formula will spread a bit more easily, but it can also fuse lashes together. Freedman suggests using a lash comb to separate and define lashes while the mascara is still wet.
Benefit They’re Real! Mascara ($22) will grab lashes and coat them all the way to the tips for length and definition.

Sparseness
Anyone hoping to fatten up sparse lashes should know that bigger is better. Ni’Kita Wilson explains that volumizing mascaras tend to use fat brushes with waxy formulas. “The waxes coat the lashes and increase the diameter of each lash,” she says.
Look for a wand with a cone shape — thick at one end and tapering to a point, says Mario Dedivanovic, a celebrity makeup artist who works on the impressive lashes of Kim Kardashian. “I use the thick part of the brush on the upper lashes, and the pointed part for the lower ones,” he says. “I sweep a few of the lower lashes at a time from left to right to evenly coat them.”
For “glam chop lashes” (Mario's term), try Lancôme’s Hypnôse Doll Eyes Mascara ($25).

Brittleness
“Mascaras that yield both thickness and volume typically have a dry formulation,” says Ricky Wilson. This allows them to be built quickly in a few coats, but it can tend to dry lashes out, making them brittle. He suggests addressing brittle lashes by layering mascaras with different formulas: “I always use more than one for those who love lashes because the different formulas provide really eye-catching effects.”
Think of your lashes as you would your hair, and condition them to prevent breakage. A dab of Vaseline on your lids at night should do the trick. Or try a conditioner designed for your lash line, like RevitaLash ($98 for a three-month supply).
You can also add “conditioner” to a dried-out mascara tube. Freedman suggests adding a drop of rosewater to the brush and swirling it around the tube. Another genius tip is to add a drop or two of SkinCeuticals Hydrating B5 Gel to your mascara to keep the formula wet.
Avoid dry, brittle lashes with Maybelline's Great Lash Mascara ($4.99). This iconic formula has been a favorite of makeup artists for decades because of its lushness and ability to build volume.

Lack of Curl
Curled lashes create a wide-eyed Bambi look that's enlivening for anyone who appears tired and dull in the early morning. You can add curves with a tweak in technique. Freedman advises brushing the center lashes straight up, sweeping the lashes in the inner corners of the eyes toward your nose, and angling the outer lashes toward the temples.
Arched brushes can also mold straight lashes into curved shapes. And there is always the trusty lash curler.
Give your lashes a dramatic turn with Stila's Forever Your Curl ($22), which reaches each individual lash and even lets you skip the lash curler.
Saturday, 21 January 2012
Makeup Junkie Top 5 Lipsticks: Bite Luminous Creme Lipsticks!

For a lipstick to be considered in my top 5 is major. I'm not only a Makeup Junkie - I'm a lip product junkie! Being a lip junkie and a makeup artist is a lethal combo. It's just my "business" to try as many lip products as I can because my clients depend on me (wink).
I did a small feature on Bite Beauty's Luminous Creme Lipstick (read my full review by clicking link) set during the holidays. I didn't include any swatches so I thought I would revisit. These highly pigmented and creamy-licious lippies feel so good on my lips and not to mention look good. It's one of the few lipsticks that doesn't accentuate my chapped lips. That is huge for me. Instead, my lips look smooth and plump. Must be the Resveratrol, a super antioxidant, that is in the lipstick.
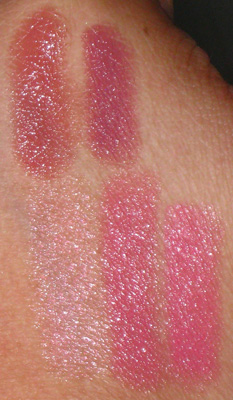
Top: Pepper (dusty rose), Shiraz (soft plum)
Bottom: Champagne (pearly nude), Fig (nude rose) and Bouquet (soft pink)
The lipstick has pretty good wear time. They lasted between 4-6 hours even after eating. The colour was still faintly stained on the lips. They are very moisturizing, but don't bleed. I found Pepper to be the "your lips but better shade". It's a good neutral that you can wear on a daily. Fig is also one of my favourites and a great pink to wear for daytime. Bouquet is on the warmer side but definitely has more pop than Fig. Shiraz is a great fall/winter plum that would work for a lot of skin tones. Champagne is gorgeous with a smokey eye for a pale lip or to use as a highlight for a plumping effect in the center.
Did you know that the lipsticks are broken up into colour families and each one has a unique slanted tip? Reds have a sharp angled tip for precise application. Neutrals have a natural slant for a natural shape and easy application. Pinks have a curved tip for a cheerful pouty lip. Berries have a pointed tip for a perfectly symmetrical lip.
I'm definitely looking forward to trying out more colours and the brand's other lines. The all-natural factor, Resveratrol anti-aging and repair properties, creamy texture, strong pigmentation, use of food grade colouring, and sleek packaging make this a Makeup Junkie Top 5 Lipstick!
What lipstick is in your top 5?
Available at Sephora locations and Sephora.com. Retails for $24 USD.
Products were sent for editorial consideration and I truly love them.
Sale!!!
And now a word from our sponsors at SHABBY APPLE. Right now you can get 20% off accessories!!! What will YOU be wearing new in 2012? I have to say that I am absolutely in LOVE with the skirt I just recently purchased there! It's perfectly high waisted and fits like a glove thanks to their easy fit guide. Go check them out and add some fabulous pieces to your wardrobe.

Friday, 20 January 2012
Beauty Review: Clean Face In A Flash!
I really try to keep to our nighttime routine. I really do - try. After the kids are tucked into bed, cleaning up is the last thing I want to do and sadly that includes my face! As a makeup artist, I always tell my clients "sleeping with your makeup is a no-no". I guess I should practice what I preach! Before Baby Z, I can honestly say I washed my face 90% of the time. The other 10% I blame on a late night out with too much wine (yup, that is a rare occasion). Now, I'll only clean my face if I've worn makeup that day - I know, I'm ashamed! I've said too much.

Clean Face In A Flash! by makeupjunkie13 on polyvore.com
Thankfully, beauty brands make handy cleansers called wipes and cleansing waters that clean your skin in a flash. I can remove makeup, tighten my pores, feed my skin anti-aging nutrients without using water (which means no mess around the sink - such a pet peeve of mine). My skin can breathe in some fresh air again. Yes!
Korres Pomegranate Cleansing and Makeup Removing Wipes For Oily and Combination Skin ($16 CAD): Korres is one of my all-time favourite all-natural beauty brands. I love the pomegranate wipes. The wipes leave my skin feeling refreshed and they effectively take off my makeup, although I usually take off my mascara with a separate remover. One little wipe can remove impurities, tighten pores, and give antioxidant protection. Cleaning your face takes less than a minute to do! If you're lazy like me, keep these at your bedside.
One pack holds 25 wipes which won't last long if you use these often. It's a little pricey for a small pack, but you get what you pay for which means it's formulated WITHOUT parabens, sulfates, synthetic dyes, petro-chemicals, phthalates, and GMO. It would be great if Korres comes out with a bigger pack! Now available at Shoppers Drug Mart locations across Canada.
Biotherm Biosource Total & Instant Cleansing Micellar Water ($26 CAD): Who knew something that looks like a toner could actually cleanse your face? Another quick cleanser, Biotherm's contains Thermal Plankton Cellular Water and is paraben-free. It feeds your skin nutrients rich in minerals and vitamins. It cleans fairly well but sometimes I feel like I need to use two cotton pads to make my skin feel really clean. My skin looks radiant and even feels soft after. It's not as convenient as a wipe because you need to use a cotton pad, but it gets the job done fast. There's a lot of cleansing waters on the market and more continue to come out. It's pretty pricey compared to some others, but Biotherm is not a drugstore brand. Bioderm's version is on my 'want' list and I believe it's slightly cheaper. But if you want something that's a steal, try Marcelle's.
What are your favourite quick cleansers? Are you guilty of not taking your makeup off every night? Be honest! :)
Products were sent for editorial consideration and I truly love them.
Thursday, 19 January 2012
Who's Your Favorite?

American Idol is under way for it's next season and from what I hear there seems to be no lack of talent....and humiliation. I have long since stopped watching the show but LOVE to blast the radio on long and short car rides and belt it out with my favorite singers. Tell me I'm not alone!!! In honor of yet another nationwide search for more vocal talent I wanted to post my favorite singers and, in my opinion, some of my favorite makeup looks of theirs. Comment to which is YOUR favorite look and I'll do a tutorial on it =)!

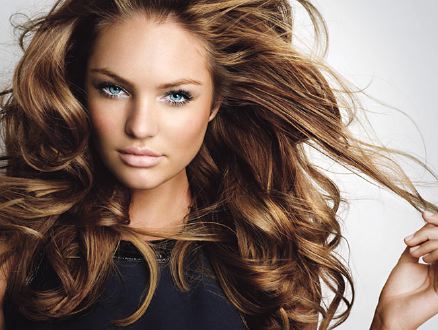
The classic red lip, gorgeous lashes, effortless style, class and bombshell blonde hair. How can I NOT love her!!!!!

Love her, hate her (how could you) or think she's full of cheese, THIS girl has some PIPES!!!!! Whenever I think of Celine Dion I think of someone that no matter how high they are going (not wise) I am NEVER cringing to see if she'll hit it. She's amazing and I would LOVE to see her in concert...insert me hinting to my hubby ; ).

This girl has had so many ups and downs but I LOVE dancing and singing to her songs. Look at that natural glow!

I fell in LOVE with this look from Burlesque. I bet you didn't know this but I actually sound just like her when I'm singing. Oh yeah, you can too! Just turn her up to the absolute max and just mouth every perfect note ; ). I always feel so badly on American Idol when someone picks a song of hers...it's just sad = (.

I aDORE Roisin Murphy's music! Chances are you like her too. Do you wtch So You Think You Can Dance? Remember Ramalama? Yup, that's her. Wade Robson uses her a lot too aaaannnndddd since I love HIM, well there you go. I wanted to put one a little off the wall and fun up and you can always count on Roisin for that!
Wednesday, 18 January 2012
Makeup Junkie & Make Up For Ever Canada Present: Makeup For HD and Makeup For Music Videos Workshops With Celebrity Makeup Artist Lucky Bromhead!

UPDATE: BIG news! Make Up For Ever Canada will be sponsoring gift bags for each workshop!! The first 20 people to sign up for either workshop will receive a gift bag with a Make Up For Ever sample kit! If you've already signed up this means you've already snagged a gift bag! Woohoo!
Hurry and purchase your tickets today! Early bird special only until January 25th! http://makeupwithluckyb.eventbrite.ca/
'Like' Make Up For Ever Canada on Facebook!

What: Makeup for HD and Makeup for Music Videos With MTV Canada's Lucky Bromhead
When: February 12, 2012
Time: Makeup for HD: 9:30 am - 12:30 pm
Makeup for Music Videos: 1:30 pm - 4:30 pm
Where: 550 Queensquay W., Toronto, ON
Main Floor Party Room (See concierge)
Advance Tickets (until January 25): $125/per workshop (Only 20 spots available per workshop!)
After January 25 Ticket Price: $150/per workshop
Advance Tickets (until January 25 - Combined Workshops): $200 (Only 20 spots available per workshop!)
After January 25 Ticket Price (Combined Workshops): $300
(If you wish to pay via Money Email Transfer please contact me at joy[at]makeupjunkie[dot]ca.)
Tickets are NON-REFUNDABLE unless canceled by host. If you are unable to attend all of a sudden, you may sell your ticket to someone else.
Tickets are NON-REFUNDABLE unless canceled by host. If you are unable to attend all of a sudden, you may sell your ticket to someone else.
Bring: Your kit, notepad/pen, and a model. Photo taking is welcomed but video recording is prohibitied.
To Purchase Tickets: http://makeupwithluckyb.eventbrite.ca/
Makeup Junkie is proud to host two workshops for one of my favourite makeup artists, MTV Canada's Lucky Bromhead! She is one of the top makeup artists in the industry and has first hand knowledge of what it takes to be a successful makeup artist. Whether you are a makeup artist in the making or just want to brush up on your skills, you definitely don't want to miss out on these workshops!

If you're looking for a career in television or will be working in print, learning makeup for HD is must if you want to make it in this industry. Learn about creating a flawless canvas, what products to use, how lighting effects the outcome of your makeup and many more amazing tips from Lucky!

Music videos always look so fun and glamorous, but a lot of work goes into the final product! Lucky has worked with top musicians in the industry. Learn about the creative process behind creating your talent's look, on-set do's and don'ts, and much more!
About Lucky Bromhead:
Lucky (yes, that’s her real name!) Bromhead has been painting faces for about 20 years. After many years as a trainer for MAC Cosmetics, and key makeup for the Canadian episodes of Elvis Costello's Spectacle! Elvis Costello With... she’s currently the head makeup artist for MTV Canada and continues to do makeup for Bravo! At The Concert Hall, The Space Channel and The Comedy Network.
Lucky’s makeup has graced the faces of Zooey Deschanel, Jared Leto, Jeff Goldblum, Sarah McLachlan, Coeur de Pirate, Cyndi Lauper, Elvis Costello, Bono & The Edge, Timothy Olyphant, Lauren Conrad (The Hills), Kanye West, Jully Black, Fefe Dobson, Tre Armstong (SYTYCD), Nikki Sixx, Jeanne Beker, Michelle Trachenberg, Emily Haines, Keisha Chante, and Erica Ehm. She's also done makeup for the music videos of Bedouin Soundclash, Nicole Holness, Matthew Good, Jay Malinowski and Armistice. Lucky was also honoured to be chosen to do makeup for the 2010 Winter Olympics in Vancouver, doing makeup for CTV's Olympic Morning. To see more of Lucky’s work, visit http://makeupbylucky.blogspot.com/
'Like' Lucky on Facebook and follow her on Twitter!
Tuesday, 17 January 2012
Beauty Event: Mix It Up For One Family Fund

One Family Fund will host its first annual Mix It Up event on January 31, 2012 at Brassaii Restaurant and Lounge in downtown Toronto. The evening will include passed hors d'oeuvres, signature cocktails, live jazz and a Silent Auction Shopping Centre. The Shopping Centre will be one of a kind and feature items from a variety of categories including fashion, beauty, hospitality, restaurants, fitness, and home decor. Some of the great beauty brands involved include Benefit Cosmetics, Gee Beauty, and Elizabeth Grant Skincare.
One hundred percent of monies raised through the silent auction will benefit victims of terror in Israel.
One Family Fund provides direct financial, legal and emotional support to the thousands of victims of terror in Israel on a daily basis. It is at the forefront in providing long-term support for physical and emotional health, education, housing, income maintenance and other needs.
To purchase tickets: http://onefamilyfund.ca/events-mixitup
Friday, 13 January 2012
Update :O
Hi :) Normally I hate posting without any kind of a picture to look at, but I don't really have anything to post, lol.. sorry! :(
I wanted to update since I haven't posted anything in a few weeks. This is mostly due to the craziness of the holidays, and the passing of my Grandfather on New Year's Eve. Several days after that were spent communing with family and planning his Memorial, which was held last Wednesday. Because he was living in Michigan at the time, my family and I drove out there and the trip took the better part of a week. Towards the end of our stay, I got sick with a cold or something that has left me somewhat lethargic and still a little under the weather. So it's been a roller-coaster of a past few weeks for me.
Not meaning this post to be at all depressing, I will say that I'm doing okay and I hope to be back to blogging soon. I have many posts to make as soon as I can find the time! I hope you will bear with me as I search for a new groove to settle into. ;)
Thanks for reading this and I hope you're all doing well! Happy weekend, everyone!<33
Thursday, 12 January 2012
Makeup 101: The 5 Minute Face
Mornings are harsh (and yet I'm up after midnight writing this!). There's just not enough time in the day to do everything I want to accomplish. My day starts in the wee morning and it ends in the wee morning. You'd think spending half the morning in a drowsy state and getting sick would teach me a lesson.
Being able to put makeup on or style my hair is a luxury these days with two little ones. Applying my makeup in a matter of minutes is a must! Here are the products I currently use on a daily to look fresh faced and somewhat presentable in 5 minutes!

Top Row:
Garnier BB Cream Miracle Skin Perfector ($19.99 CAD): You'd have to be hiding under a rock if you haven't heard about the latest craze in beauty. BB Creams, a beauty secret from Asia, is now hitting North America. What is a BB cream and why all the buzz? BB creams is an all-in-one skin perfecting product that combines skincare with makeup. Some are even made to improve acne overtime.
I first learned of it when my brother's girlfriend from Korea was visiting us. She said she loved because it improved the overall appearance of her skin and lightened her skin too. Making my skin lighter really didn't appeal to me so I brushed it off not really thinking it would make its way here.
Brands like Garnier have included all the skin nourishing properties minus the skin lightening ingredients. I've heard Marcelle's is really good and I tested Estee Lauder's version. I found it to be drying for my skin and the shade was too light. I've been testing out Garnier's for a few weeks now and so far I'm liking it. Here's what I like about it: evens out my skin tone, diffuses my wrinkles and fine lines, makes my skin look radiant, and is ultra moisturizing. It also has sun protection. It's a cinch to put on especially if you're in a hurry!
The shade I received is medium-dark. It seems to match me pretty well, but it has a slight pink undertone. After it sets, it just looks like my skin. The coverage is like that of a tinted moisturizer. I'm not really sure what sets it apart from some TM's that also offer anti-aging ingredients, SPF, and coverage. Possibly BB creams offer higher anti-aging ingredients? All in all, I really love how my skin looks after. I get decent coverage in a matter of seconds. Available January 2012.
Smashbox Photo Op Under Eye Brightener ($18 USD): A staple! An eye brightener and concealer all in one. Read my full review here.
Anastasia Brow Duality ($23 USD): A multi-purpose highlighter for brows, eyes, cheekbones, and even the top of your lips! I like to wear this in the inner corner for a brightening effect. Read my full review here.
Shu Uemura Eye Lash Curler ($26 CAD): I never go a day without this! This lash curler gives my lashes the most perfect curl.
L'Oreal Voluminous Million Lashes Waterproof Mascara ($12 CAD): For the longest time I was using Covergirl LashBlast Waterproof Mascara, then I moved on to various ones from L'Oreal to Maybelline to some high end ones. The drugstore near me had a sale on L'Oreal mascaras so I picked up this one. I hadn't really heard reviews for it but I picked it up anyways. It's a great waterproof mascara with minimal smudging. I'm able to get my lashes full and long with lots of curl (waterproof mascara is the only thing that can curl these straight lashes). The only downside, not a huge one, is that my lashes look crunchy and hard rather than soft and fluttery.
tarte Amazonian Clay Waterproof Liner ($18 USD): Finally an eyeliner that actually doesn't smudge! For subtle definition I like to smudge underneath my top lash line very close to the base of my lashes. Read my full review here.
Bottom Row:
Burt's Bees Tinted Lip Balm in Pink Blossom ($7.99 CAD): Tinted lip balms are the easiest lip products to wear. You get a little colour and it hydrates at the same time. I love Burt's Bees tinted lip balms. They are inexpensive and give just enough colour. Pink Blossom is a soft pink, but surprisingly it really shows on the lips! I think it's the perfect shade of pink - not too red and not too pale. I also love Tiger Lily for a peachy nude lip. Read my full review here.
Korres Cherry Picked Cherry Oil Lip Gloss ($17 USD): When I want a little glossy shine, I love wearing these glosses from Korres! For a pink nude lip, I like layering Light Purple 23 over top of Burt's Bees Pink Blossom. Read my full review here.
Becca Beach Tint: I think a flush of colour on the cheeks is the perfect perk-me-up. These lovelies don't budge and give the prettiest glow. Thanks to ebeauty.ca, I was able to add Guava, Grapefruit and Peach to my collection. Read my full review here.
Benefit PosieTint ($36 CAD): I like to go between a few cheek tints and this is definitely one I reach for. Read my full review here.
Revolution Organics Beauty Balm ($34 CAD): When I want a really dewy finish and when my skin is screaming for moisture I love dabbing these puppies on. For a really quick look, I use Bronzed on my eyes, cheeks and lips. I own all three in Blushed, Sunkissed, and Bronzed. Read my full review here.
When you only have 5 minutes, what are your go-to products?
Products were sent for editorial consideration (with the exception of the L'Oreal mascara and Shu Uemura lash curler) and I truly love them.
Makeup Junkie & Dior Canada Present: Bridal Makeup Workshop With Dior Canada's Senior Artist Fredis V.

What: Bridal Makeup Workshop With Dior Canada's Senior Artist Fredis V.
When: February 5, 2012
Time: 1:00 pm - 4:00 pm
Where: 550 Queensquay W., Toronto, ON
Main Floor Party Room (See concierge)
Advance Tickets (until January 25): $100
After January 25 Ticket Price: $120
(If you wish to pay via Money Email Transfer please contact me at joy[at]makeupjunkie[dot]ca.)
*Tickets are NON-REFUNDABLE unless canceled by host. If you are unable to attend all of a sudden, you may sell your ticket to someone else.
*Tickets are NON-REFUNDABLE unless canceled by host. If you are unable to attend all of a sudden, you may sell your ticket to someone else.
Bring: Your kit, notepad/pen, and a model. Cameras and video recording are welcomed.
To Purchase Tickets: http://fredisvbridalworkshop.eventbrite.ca/

Makeup Junkie is proud to host alongside Dior Canada, a bridal makeup workshop for makeup extraordinaire and Dior Canada's Senior Artist, Fredis V.! Attendees will be in for a treat! With wedding season just around the corner, it's the perfect workshop to refresh your bridal skills or to learn some new ones.
The workshop is not only for makeup artists though. If you are a bride getting married this year and thinking about doing your own makeup, this workshop will help you learn the techniques needed in creating a look that is right for you. As a bonus, each attendee will receive a little gift bag with some amazing Dior products!

Working for one of the world's top beauty brands, Fredis knows the hottest trends in bridal makeup. You'll learn how to execute a flawless canvas, how to create the picture-perfect look for your bride, and what techniques are the most efficient and effective. You'll also learn the top bridal makeup trends for 2012!

About Fredis V.:
Based in Toronto, Fredis Velasquez is widely known around Canada, as the go-to professional makeup artist among the industry's best. He is one of the most sought after make-up artists in Toronto, who aims to achieve a flawless face, lush lashes, and the perfect brow for his clientele. His exceptional artistry skills allow him to create a luminous glow that is seen on the red-carpets of Hollywood’s elite. Fredis specializes in Editorial, Red Carpet Events, Commercials, Music Videos, and High Profile Weddings. He has more than 14 years of experience as a professional makeup artist and has worked with the most innovative, standard setting, skincare and cosmetics enterprises in the industry.
Fredis' distinct style allows his work to stand out from other makeup artist; making stops at various work venues along the way such as MAKE UP FOR EVER, FRESH, NARS, AVEDA, MAC, Bobbi Brown, Laura Mercier, GIORGIO ARMANI, YSL, Shu Uemura and DIOR Canada including many more! Fredis is currently the Lead Consulting Artist for Dior in Canada. He is dedicated in fulfilling his client’s vision as he pays close attention to detail and enhances natural beauty. His down to earth demeanour makes everyone feel comfortable in his hands, illustrating a contemporary and pure expression that produces an astounding outcome.
'Like' Fredis on Facebook and follow him on Twitter!
Hair Resolutions
A somewhat silly video of me and my ambitions for hair in the new year. Anyone that knows me knows that I am AWFUL and always putting my hair back in a bun or a ponytail. Alas no more, my friends, I will truly be attempting to be better in every way at the anomaly known as hair. It intrigues me with it's mystery and often bamboozles me at it's trickery. Come laugh/cry with/at me on my journey ; ). Remember to watch it in HD!!!
Monday, 9 January 2012
Beauty Buzz: Do You Have What It Takes To Be Make Up For Ever's Next Unretouched Model? Then Read On!

Listen up all you Make Up For Ever fans! All you beauties who love their products and love the camera have the chance to be apart of MUFE's Unretouched Campaign. That's right - no Photoshop necessary to hide all your embarrassing (or "unique" for a more positive twist) flaws. They want YOU using Make Up For Ever products in your best picture-perfect beauty look. After all, real life isn't retouched!
Contest Rules:
- Contest runs now until February 1st, 2012.
- Submit your picture-perfect look to MUFE's dedicated website: www.hd.makeupforeverusa.com
- All finalists' photos will be featured in a photo album on MUFE USA Facebook Page.
- The winner will be announced on February 9, 2012 and then flown to New York City for her professional photo shoot!
- Casting call is open to all women over 18 residing in the U.S. and Canada.
The lucky winner will star in an advertisement that highlights MUFE's new HD Complexion Starter Kit ($89 Exclusive at Sephora) the ultimate tool box to perfect your complexion that can be uniquely personalized to include each client's ideal shade of HD Invisible Cover Foundation. You can pick your shade with an interactive Shade Finder tool: http://hd.makeupforeverusa.com/#shade_finder
Good luck!
Sunday, 8 January 2012
Reese Witherspoon (& a red lip)
I had a request from Ashley for a Reese Witherspoon look and also a red lip tutorial. I kind of just put them both together since they came from the same person =). You can also watch it in HD!!!!!!! SO much better quality. Click play and where you see the numbers 360p, click on it and choose the 720pHD version =). She wanted to know how to do shadow on hooded lids and how to make a red lip not look trashy with her coloring. She also sent me some pictures of herself and holy COW does she look like Reese. Check out that jawline!!!

This is the red lip that I chose for the look but not the eye makeup. I think this lip will look stunning on Ashley with it's slight orange undertone.

Here is cute Ashley herself =).

This is the eye makeup that I chose for the tutorial. Soft and somewhat pinky nude in it's color with fabulous sparkle. Great for the red carpet and stunning for an everyday look. I'll be doing a more dramatic Reese eye in the future.
Saturday, 7 January 2012
Beauty Feature: I'll show you mine if you show me yours...my vanity that is!
What does your vanity mean to you? And I'm not talking about your outer appearance. I'm talking about your space, your quiet place, your escape where you can lay out all your pretty things and slather on your most favourite beauty products. That's what my vanity means to me. There's something to be said for everything having its place.
For a long time, I used large computer desks as a vanity. Why? Because it was not only functional and cost effective, but because it was big enough to lay out all my makeup. It was neither pretty or full of character, but it worked.

This here is my dream vanity. A little much? Maybe, but I think it's beautiful! It's so classic, feminine, and in my favourite Parisian style. One day, but for now my current vanity isn't so bad.

My vanity is one of my favourite spaces in the house. I love sitting here in the mornings getting ready for the day and staring out the big window. I like to gather my thoughts here and write out my to-do list (which I haven't been doing lately!). Instead of going with something big and clunky, I chose a smaller, traditional size vanity table. I hate sets so I opted just to get the table (which I hopefully plan to give it that cracked old shabby chic look). I was going to go with a chair, but because I don't have much drawer space, I chose to go with a ottoman stool that can be used for storage. I have a few beauty items that I reach for everyday in the drawers.

It's very roomy and fits my large makeup bag, a medium sized one and a small makeup bag plus two of my sunglasses in their case. These are the products I use on my self on a daily or when I'm going out somewhere. If I want to use more products I just pull from my Zuca and my clear storage drawers which are in the walk-in. This way, my desk stays clean and clutter free. I chose a metallic bronze shade. I think it compliments the desk pretty nicely.

Your vanity is a great way to express your individual style and to showcase all the pretty things you love. One of my favourite gifts was this Parisian-inspired mannequin jewelry holder. I love layering my favourite necklaces there. It's a great statement piece. I found our old wooden hand sculpture packed away that we use to display on our bookshelf. This was perfect for displaying some of my rings (I clearly need more!). I love the look of books on display. Here I have Ines de la Fressange's style guide to Paris, Parisian Chic and two Chanel press books from the Fall and Spring 2012 collection. They are so pretty and full of product shots and beautiful photos from the collection's inspiration. I love my little friendship jewelry box which was a bridesmaid's gift. I hold little trinkets and jewelry items in there. I bought a silver tray to display all my favourite perfumes. Perfume bottles come in all lovely packaging and make for beautiful eye candy. I also laid out two lipsticks - Chanel Rouge Coco shine from the Spring collection (review to come!) and my YSL Rouge Pur Couture Golden Lustre with my name engraved on it.
And there you have it. I'm still thinking of displaying my makeup brushes in a cute holder (maybe the one from Topbox?) and getting a table mirror. I will have to re-arrange things to make space. I love having a space that's all mine with my own stuff. Having two kids, your space can be taken over with toys and books, so my vanity is my little get away from all the kid clutter!
What does your vanity look like? I'd love to see! I always love getting ideas and seeing how other makeup junkie's display their favourite beauty items. Email me some photos and I will feature yours on my blog!
Subscribe to:
Comments (Atom)